


%20(6).webp)


Google Analytics 4 (GA4) is the latest version of Google Analytics, designed to give businesses deeper insights into how users interact with their websites and apps. Setting up Google Analytics 4 (GA4) is essential if you want to understand how visitors interact with your website. GA4 provides detailed insights into traffic, user journeys, and conversions, giving you the data needed to improve marketing and business decisions.
Unlike Universal Analytics, GA4 uses an event-based tracking model, making it more flexible and future-proof for cross-platform measurement. Installing it correctly ensures your data is accurate from the start.
So, how can you install Google Analytics 4 on your website step by step without running into errors? Let’s break it down.
What to Do Before Installing GA4
Before you begin the installation, reviewing a few things is important to ensure a smooth setup. Preparing these steps in advance avoids duplicate tracking, missing data, or access issues later.
1. Check if GA4 is already connected
- Many websites that had Universal Analytics might already have GA4 set up.
- Log in to your Google Analytics account and see if a GA4 property is available. If it exists, you may only need to configure events, not reinstall.
2. Confirm Google Account Access
- Ensure you are signed in with the Google account that has admin-level access.
- You won’t be able to create or manage properties without the correct permissions.
3. Review Website Platform (CMS or Custom Code)
- Identify how your website is built (WordPress, Shopify, Wix, or custom HTML).
- This helps decide whether to install GA4 directly with code or use Google Tag Manager (recommended for flexibility).
4. Set Up Google Tag Manager (Optional but Recommended)
- If you plan to use GTM, create a GTM container for your site before installation.
- GTM makes it easier to manage tags without editing your site’s code repeatedly.
By preparing these steps in advance, you’ll save time and reduce errors during installation.
How to Set Up a GA4 Property?
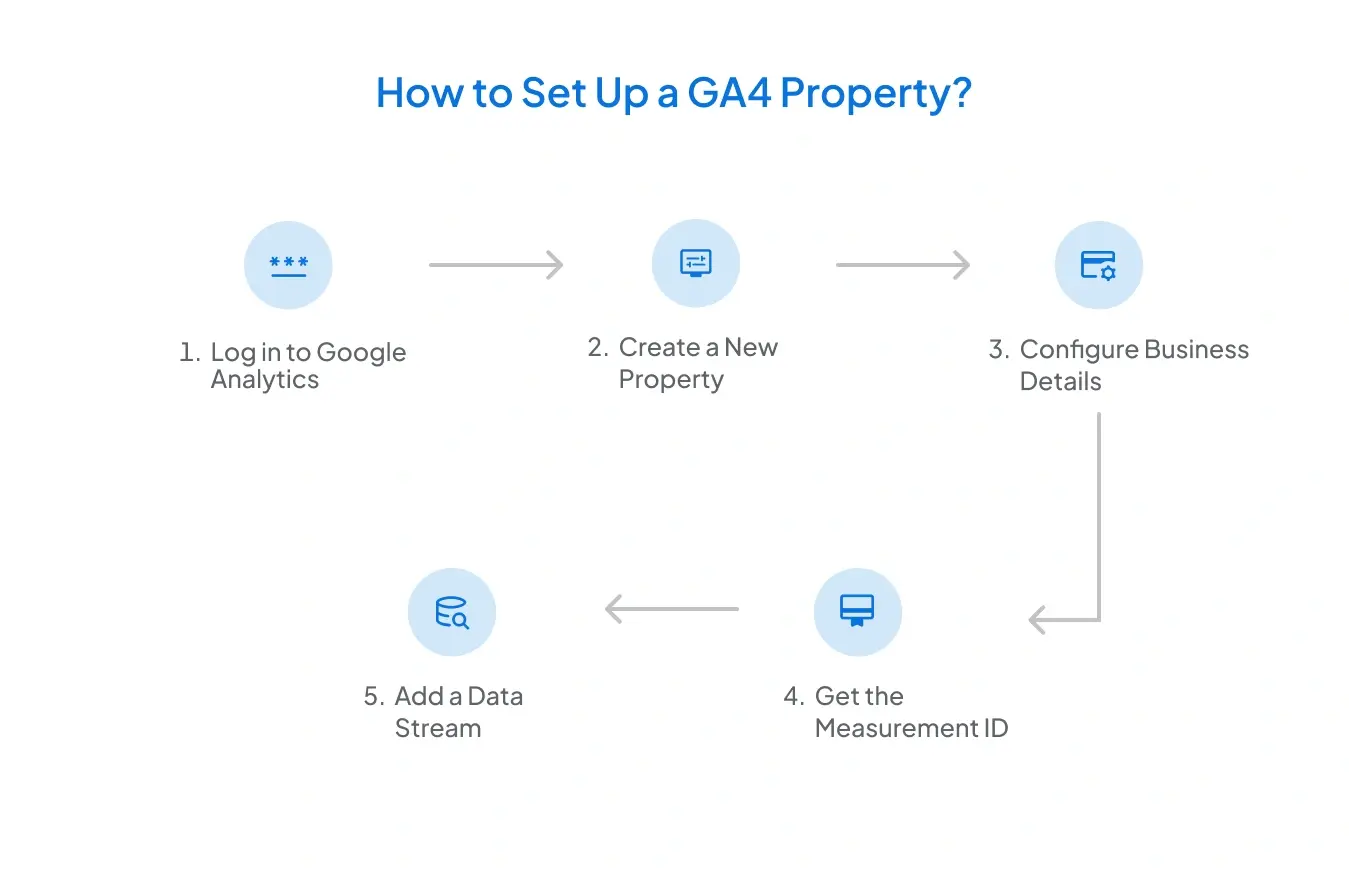
Once you’re ready, the first step is to create a GA4 property in your Google Analytics account. This property will store and organize all your website’s tracking data.
Step 1: Log in to Google Analytics
- Go to analytics.google.com and sign in with your Google account.
- Make sure you have admin access for the account you’re working on.
Step 2: Create a New Property
- In the left sidebar, click on Admin.
- Under the “Account” column, select the right account.
- In the “Property” column, click Create Property.
- Enter a property name (e.g., “My Website GA4”).
- Select your reporting time zone and currency.
Step 3: Configure Business Details
- Choose your industry category.
- Select your business size.
- Define how to use Google Analytics (e.g., measure customer engagement, optimize ad spend).
Step 4: Add a Data Stream
- Choose Web for websites.
- Enter your website URL and stream name.
- Enable enhanced measurement to automatically track events like page views, scrolls, and outbound clicks.
Step 5: Get the Measurement ID
- Once the data stream is created, you’ll receive a Measurement ID (looks like G-XXXXXXXXXX).
- This ID will be used later when installing GA4 with Google Tag Manager or gtag.js.
At this stage, your GA4 property is created. The next step is to connect it with your website so that it can start collecting data.
How to Install GA4 Using Google Tag Manager (GTM)
.webp)
Google Tag Manager (GTM) is the easiest and most flexible way to install GA4 on your website. Instead of editing your site’s code directly, GTM lets you manage tags from one place.
Step 1: Log in to Google Tag Manager
- Go to tagmanager.google.com and open your GTM container.
- If you don’t have one, create a new container for your website and add the GTM code snippet to your site.
Step 2: Create a GA4 Configuration Tag
- In GTM, click Tags > New > Tag Configuration.
- Select Google Analytics: GA4 Configuration.
- Enter the Measurement ID from your GA4 property (G-XXXXXXXXXX).
- Leave other settings as default for now.
Step 3: Set the Trigger
- Under Triggering, choose All Pages.
- This ensures GA4 loads on every page of your website.
Step 4: Save and Publish
- Click Save to create the tag.
- Then click Submit in GTM and publish the changes.
Step 5: Test the Installation
- Use GTM’s Preview Mode to check if the GA4 tag is firing correctly.
- Open your website in preview mode and confirm that GA4 is receiving hits.
Installing GA4 through GTM allows you to add more tracking (events, conversions, etc.) without changing your site’s code again.
How to Install GA4 Without Google Tag Manager
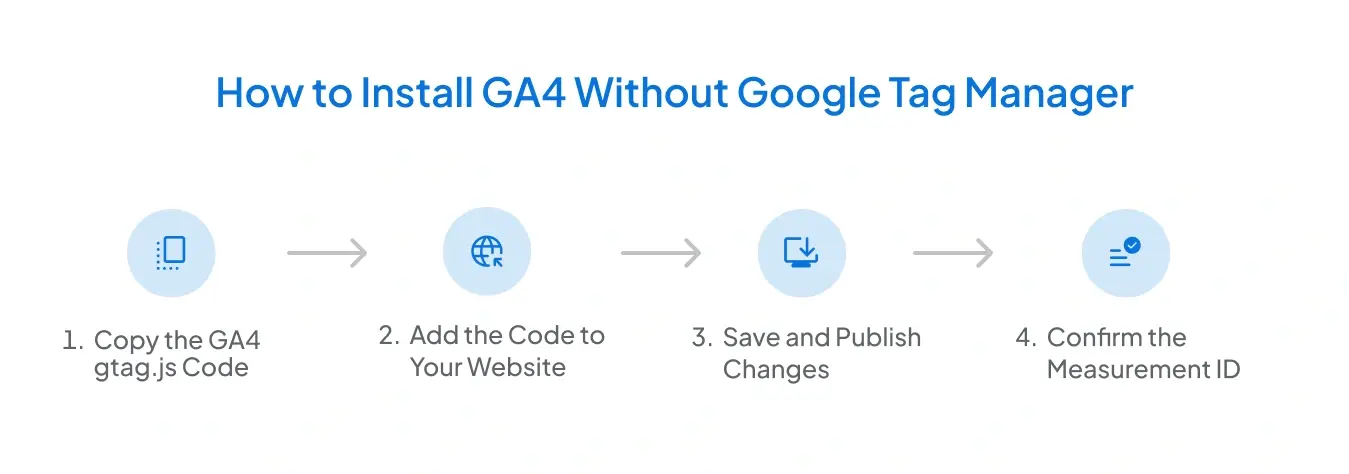
If you don’t want to use Google Tag Manager, you can install GA4 directly on your website using the gtag.js tracking code. This method involves placing the code in your site’s header.
Step 1: Copy the GA4 gtag.js Code
- In your GA4 property, go to Admin > Data Streams.
- Select your website data stream.
- Under “Tagging Instructions,” copy the Global Site Tag (gtag.js) snippet.
Step 2: Add the Code to Your Website
- Paste the gtag.js code inside the <head> section of every page on your website.
- If you’re using a CMS (like WordPress, Shopify, or Wix), most platforms have a settings area or plugin to insert tracking scripts.
Step 3: Save and Publish Changes
- After adding the code, save and publish your website updates.
- Make sure the script appears only once on each page to avoid duplicate tracking.
Step 4: Confirm the Measurement ID
- Double-check that the Measurement ID (G-XXXXXXXXXX) in the code matches the one in your GA4 property.
This method is simple but less flexible compared to GTM. If you need to add more tracking later, you’ll have to edit the code again manually.
How to Verify GA4 Installation?
Once you’ve installed GA4, whether with GTM or gtag.js, you must confirm that data is being collected correctly. A quick verification ensures your setup is working before you rely on reports.
Before using debug view in GA4 ;
Use Google Tag Assistant (Preferred)
- Open your website with the [Tag Assistant Companion extension].
- Enter Preview Mode from GTM.
- Confirm the GA4 Configuration tag is firing correctly.
Important: If you use Google Tag Manager, make sure you’ve removed any hard coded GA4 gtag.js from your site to avoid duplicate tracking.
1. Use DebugView in GA4
- Go to your GA4 property.
- In the left menu, click Admin > DebugView.
- Open your website in a browser with GTM Preview Mode or the Google Analytics Debugger extension.
- Check if events like page_view or scroll appear in DebugView.
2. Check Real-Time Reports
- In GA4, open the Reports > Real-Time section.
- Visit your website in a new tab or device.
- If installed correctly, you’ll instantly see your active visit and tracked events.
3. Use Chrome Extensions for Validation
- Install the Google Tag Assistant or GA Debugger extension.
- Open your site and confirm the GA4 tag is firing.
4. Confirm Measurement ID
- Open your site’s source code (Ctrl+U) and search for your Measurement ID (G-XXXXXXXXXX).
- Make sure it matches the one in your GA4 property.
If all checks pass, your GA4 setup is working and ready to collect data.
Using GAfix.ai for Easy GA4 Setup and Audits
Even after installing GA4, many websites face issues like missing events, duplicate tags, or incorrect data tracking. Manually checking every detail can take time, especially if you’re unfamiliar with the technical setup. This is where GAfix.ai helps.
1. Automated Setup Validation
- GAfix.ai runs automated checks to confirm your GA4 property is linked correctly.
- It flags missing tags, wrong Measurement IDs, and setup errors within minutes.
2. Audit for Tracking Accuracy
- The tool reviews key tracking areas such as page views, events, conversions, and user engagement.
- It highlights what’s working and what needs fixing.
3. Easy to Use
- No coding skills are required.
- Simply connect your GA4 property, and GAfix.ai generates a detailed audit report.
4. Ongoing Monitoring
- Instead of doing one-time checks, you can schedule audits regularly.
- This ensures your GA4 data stays accurate even after site changes or new campaigns.
By using GAfix.ai, you save time on manual troubleshooting and ensure your GA4 setup delivers reliable insights for decision-making.
Conclusion
Setting up Google Analytics 4 is the foundation for collecting accurate data about your website visitors. Whether you install it using Google Tag Manager or the gtag.js code, the key is to verify the setup so you can trust the reports.
A proper GA4 setup allows you to measure traffic sources, track events, and analyze conversions that drive business results. Tools like GAfix.ai make installation checks and audits much easier and help you avoid common errors or speed up the validation process.
By following the steps in this guide, you’ll have a working GA4 property ready to capture insights that help improve marketing and website performance. After installation, review your default events and set up custom events and conversions (such as form submissions, purchases, or scroll tracking) to make GA4 truly align with your business goals.

Frequently Asked Questions
Do I need Google Tag Manager to install GA4?

No, GA4 can be installed either with Google Tag Manager (recommended for flexibility) or directly using the gtag.js code. GTM makes it easier to manage multiple tags without editing your website’s code.
Where do I find my GA4 Measurement ID?
In your GA4 property, go to Admin > Data Streams, select your web stream, and copy the Measurement ID (starts with G-). This ID is required when installing GA4 with GTM or gtag.js.
How do I confirm if GA4 is tracking correctly?
You can verify the setup using GA4’s DebugView, check Real-Time reports, or use Chrome extensions like Google Tag Assistant. If you see page views and events appearing, your installation is working.
Confident Decisions Start with Accurate Tracking
Ensure your GA4 and GTM are correctly configured, reliable, and ready for scale.


Subscribe To Our Newsletter


